All of my friends know that I show this video as what I feel is “the maximum” that an MMD music video can be!
Post-Production Editing: The Next Step in MMD Video Evolution!
The MMD videos I make are pretty straight-forward… some of them look pretty good, but they rank as only average on the “MMD Quality” scale… with very little “Wow!” factor.
Good day readers, I am Jalu a Indonesian MMD’er and I am new here. I was wanting to share my techniques, for creating HD 60 FPS MMD videos and uploading them to YouTube.
There is still a lot that I have to learn about MMD, but Let’s learn together. :D
Introduction
Since YouTube supports 60 FPS videos these days, you must have seen a lot (or at least some) of MMD videos being uploaded in 60 FPS. (FPS stands for Frames Per Second, for the people who don’t know.) If you are like me and thought: Well why not set the frame-rate to 60FPS in MMD’s render options and you’re done, right? Well this is not everything you have to do. If you don’t use proper codecs and settings, the end result may be at a low quality. In this article I will be explaining how I render in 60 FPS step by step.
Sooo… let’s get started!
Step 1: Create an MMD animation.
Load up MMD and make your animation. It can be anything you like. It doesn’t matter for this tutorial. But for this Article I will be using my latest MMD video I uploaded to my YouTube channel. You can watch it at the bottom of this page.
Once finished with your animation, you must render it to an AVI, of course. AVI video is a container format, which means it can contain any codec you would like. (well not all, but I am not going into detail here because that will get very complicated.)
So which codec should I use?
Choosing a proper codec is what a lot of people forget when making videos in general (not just MMD). You may think it is as simple as picking any codec that you like, Right? Well this may turn out ok. But I have found a codec called Ut Video.
Ut Video is a lossless codec, which means that whatever goes in, comes out. A lot of codecs are “lossy”, this means that there is quality loss after encoding. YouTube also uses a lossy codec.
The nice thing about this codec is, that it is both 32-bit and 64-bit. This means that this will work in 64-bit MMD. Most codecs I tried before only worked in 32-bit. So I had 2 MMD versions running. (64 and 32 bit) This codec is also fast at encoding 60 FPS video.
Ok so, where do I download this codec?
You can download the latest version (15.3.0 as of writing this article) of Ut Videoby clicking this link (the latest release is at the bottom of that page)
Step 3: Rendering in 60FPS using Ut Video
UPDATE: 29-04-2016: Due to a bug in Ut Video, the audio may get out of sync at some point in the video. A workaround is to lower the screen size in MMD, if you run into this bug.
Before you start rendering make sure your screen size is at least 1280×720 or YouTube won’t encode your video in 60 FPS,use this article from YouTube as reference for your resolution (screen size). There is a table on there that shows you the resolutions you can use. I selected 2560×1440
Rendering using this codec doesn’t differ from any other codec, except that you have to change some settings.
Do the following:
Go to file (F)
Click on render to AVI file (V)
Choose where you want to save your video file.
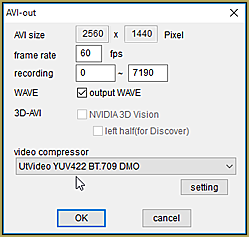
On the AVI-out screen change the following settings (or check the picture)
Set frame-rate to 60 FPS.
Select UtVideo YUV422 BT.709 DMO as compressor. NOTE: YouTube prefers 4:2:0 subsampling to be uploaded, use YUV420 BT.709 DMO for faster processing by YouTube.
Now click on the settings button.
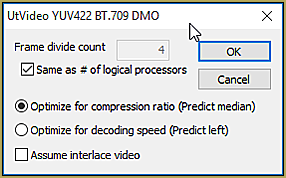
Select the following settings:
Tick “Same as # of logical processors”
Select “Optimize for compression ratio (Predict median)”
Click on OK.
Then click on OK to render.
This should render the video in proper 60 FPS! :D
IMPORTANT NOTE:
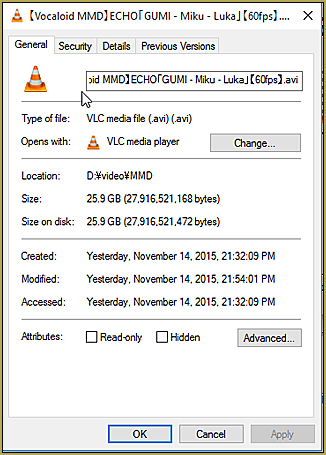
When using this codec make sure you have at least 40GB of free hard drive space. This codec outputs very large files. As you can see in the image this video is almost 26GB large.
We are going to fix this in the next step. I don’t know how long your video is, so 40GB is a good recommen- dation.
Another note, Rendering may take a long time. Anything from a few minutes to a couple of hours. This depends on your screen size, the amount of MME effects that you have used and the speed of your processor and video card. I have a High End computer, so I was able to render this in 15-20 minutes. (For the fellow geeks around: here is an image of my system)
Step 4: Transcoding the video to upload it to YouTube.
The file we rendered in the last step cannot be uploaded to YouTube. YouTube doesn’t support this codec. So we will have to “transcode” it. We can do this by using a video converter. I use this one by DVDVideoSoft.com Before you start to install it, make sure you have the latest version of the K lite codec pack. You can download it from this website. (Download the Mega pack) This will help in improving the quallity of the transcoded video a lot.
You can use any converter you like as long as you set this in the settings (the magic wand in DVDvideosoft):
Select original quallity
Output as MP4
Frame rate: same as input, or 60 fps
Video codec: H.264_high
Bitrate: same as input
Width and Height: same as input.
Audio: all audio settings have to be same as input. (with AAC format)
Set your output directory to where you want to save the file. Click on Convert. This may take a while to complete, and it will use up your entire processor power, so other tasks may lag when transcoding. (Other tasks still work fine during processing for me though, but don’t do any intensive tasks.)
UPDATE 30-05-2016: After some experimenting and feedback from others I have switched to a different program. It is called Handbrake. It is free and open source! You can download it here: https://handbrake.fr/ It works allmost the same as DVDVideoSoft. Only the settings are located elsewhere. It also has more features for advanced users.
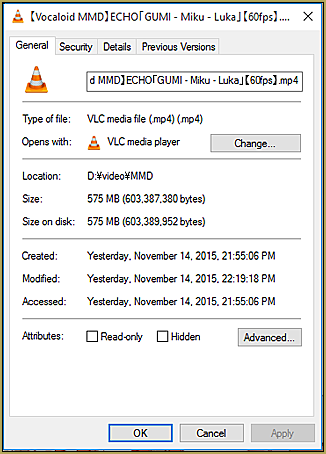
Alternatively you can use Windows Live Movie Maker to render the video (1080p max) WeActOnImpulse has an article about this: Render your MMD Video in 1080p HD Using Windows Live Movie Maker although I don’t really recommend this, because MovieMaker nuked the quality after processing my video both local and on YouTube. But if you decide to try it this way, make sure to set it to 60 FPS! (I may look into this in the future though, why it does this.)This should convert the video to a format that YouTube can process easily. It also is way smaller in size. This final video for me looked like in this image above. 575 MB is a good size.
Be sure to include 60 FPS in the title of your video, this will tell people who browse YouTube that your video is 60 FPS.
Also, becasue it is 60 FPS, you will have to wait a little longer for it to process. This is my result:
Some tips/notes:
Make sure to playback your video after rendering from MMD. If you use VLC, you can’t play it back. VLC also doesn’t support the codec. Use Windows Media Player instead. Do the same when you are done with transcoding.
Why go through all of these steps?
The reason for using this method is that, this way, you prevent YouTube from destroying your video after processing. It is also because direct H.264 codec in MMD 32 bit makes MMD crash (at least for me) This is because this codec doesn’t work well with the AVI format.
If you have any tips/suggestions, if you have used this article to render your videos, if you have any questions or if you have another method of processing your 60 FPS videos, please tell me in the comments. I like to answer questions and I am open to feedback.
This article was inspired by this post from Trackdancer on Deviant art I was browsing through his DeviantArt when I saw that post. You can read through some MME effects noted there but I was mostly interested in the codec.
So, this covers what I have discovered about rendering in 60 FPS in MMD
When you first loaded MMD into your system and you opened it all you
saw was a rather intimidating interface and a rather bleak grid (By the way,
this grid is the display panel). First of all: Don’t Panic. If
you’ve downloaded the DirectX9 version and you speak English-then you’re in
luck! The main menu options are in English. (Note: The instructions in all my
articles refer to the DirectX versions
Program
First, the bad news, MMD does not give you any music files (.wav) and
you cannot use any other music formats in MMD. Secondly, you don’t get any
motion data (.vmd) files. The only files you can immediately
open are the sample files and loading the models. Now, before you start
thinking you got ripped off, you have to remember that this is freeware.
All the videos you have seen to date have started from this very point. So take
heart you’re in good company and again:
Don’t Panic.
Now the good news, there are all kinds of sites where
you can get these model,motion and music files. YouTube, DeviantArt,
and mikudance.info are probably the most popular and familiar.
Just type into your favorite browser the name of the song and .wav and or
motion data and all kinds of options will be available to you. You should
use WinRAR or 7Zip; both can be downloaded for free at cnet.com (http://download.cnet.com/windows/?tag=hdr).
I use WinRAR (I do a LOT of downloading). Use whatever you’re most comfortable
using. You should also take this time
to organize your folders (models in the models folder;motion
data into the motions folder; music in
the Wave). A good habit to establish early on, is to document who
made the data you are downloading. Please give credit where credit is due. You
don’t want to start off your MMD experience as a leech!
How to Load Models.
Let’s load a model. You can do this right away, without any
downloading. First, go to the Model Manipulation panel and
click load. A window will open up and allow you
to choose your model. Your options are 11 models, a
bunch of eye files, some graphic files, and a Dammy Bone (This is actually
called the Dummy Bone (Something was definitely lost in the translation).
Please go the other articles in this site for more information regarding the
Dummy Bone). Now pick your model and load it up.
How to load Music Files:
Once you’ve downloaded some .wav files. Here’s how you load music
data: Click on the file option of the main menu and
select load WAV file. Select the file you want and
it will load up. You will see some graph lines in the white field below theFrame
Manipulation Panel. Unless, there is an awfully long silence before the
actual music starts.
How to Load Motion Data.
In the “Extra”
section below I hope you download some .vmd files. Here’s how you load motion
files. At themain menu bar; click on file; select load motion data. The motion data’s window will
open up and you can click on the appropriate .vmd file for your .wav file. Now
pressplay in the grey play panel. and watch your model sing and
dance.
EXTRA!!!
A good starter source for a fledgling MMDer is right here:
She has what can best be called starter packs. It is called:
MMD BIG MOTION CAMERA WAV PACK
If you have WinRAR or 7Zip go there and download them. These 9 Bundle
Packs contain motion, wave, and camera motion files! After you have dl’ed
them; separate them into their coordinating MMD files (Trust me and take the
time to do this. It will save you hours of wasted time later).
Right above that, is a source for some of her stages.
[MMD] Stage(s) Download -Made by Harner Production’s
Some of the stage links have been taken down, by the way, but not all of
them (She has designed some very popular stages). She has done a great
service to the newbie MMDer. Don’t forget to mind your manners: thank her.
How do I use MikuMikuDance? How
do I make smooth motions with MikuMikuDance? How do I make music videos with
MMD? What do I do first with Miku Miku Dance?
A beginner’s Getting-Started Guide…
How do I use MikuMikuDance?
MikuMikuDance is a free 3D animation
software for the PC with a huge, world-wide following!Download the latest version of
MikuMikuDance from theLearnMMD Downloads page, and get
started!
First … move the downloaded ZIP folder to
your desktop. Unzip the MMD folder: just double-click it and choose “Extract
All”, and OK the defaults … and you will find the MMD folder on your desktop,
ready to go! There is no install; MMD runs from its folder on your desktop.
Open MMD … MikuMikuDance.exe …
It
opened, right?
If not …
there
are a handful of possible issues for you to investigate.
Carefully readthe
error statement so that you can know what needs to be done. Take a look at theTutorial List on
the right side of this page to see the many solutions that we offer. Also see
the special instructions in the top area of theDownloads page. Don’t feel alone!
Many beginners have a spot of trouble getting MMD to start the first time … do
the research; see what you can do to get it running … or leave a comment on any
of our tutorials and we will reply to your comment (or we will even contact
you) with our help! … be sure the email address you leave in your comment is
correct so that we can answer your question, personally.
Okay
… MikuMikuDance opened!
How do I
get startedwith MikuMikuDance?
What do I do first?
I recommend that you play the Sample Dance
first. It shows you what MMD can do! Just go to theFILEtab, and clickopen(O)… and open thesample.pmmor the sample(AllStar).pmmsample
dance … those are the two dances that are included in your original download.
(NOTE: there is no music included for the Sample dances … they are silent.)
Add Miku…
and
play with MikuMikuDance!
Next you will want to go to theFILEtab and click onNEWto bring back the white, empty stage.
Find theLOADbutton near the lower left of your
screen … in the brown area … and choose your favorite model from the list… one of the MIKUs, of course.
NOW is when it gets complicated!
For further instructions on the basics of making Miku move,
of “doing” MikuMikuDance, See LearnMMD’sHOW TO pagefor a
list of links to our tutorials that will help you find out what you want to
know … what youNEEDto know as you work with MikuMikuDance.
Also see the Bonus Pages pagefor
links to some of their hard-to-find tutorial pages!
What do I do with MikuMikuDance?
Most new MMDers discovered MikuMikuDance
by seeing some of the tens-of-thousands of MMD videos on YouTube … and they
think they’d like to try it for themselves. Once they have MMD running on their
desktop, they discover how complicated it can be! …just calm down and take it easy.Yes
… MikuMikuDance is complicated if you want to make your own animations from
scratch … but there are EASY ways to use it, too!
Memes
…
The easiestway to make an MMD animation and video is to use ameme(rhymes withseem). LearnMMD has
a meme that you can download right from our Downloads Page … the “Happy Hands”
meme. Find it on our downloads page, download the Happy Hands zip folder, unzip
it … and you will find files for the music, the motions, and even a background
image: Pink … See thefull instructions for doing the Happy Hands
meme. Search YouTube forMMD memeand
you willfind many videos that include download-links to the meme
files.
Comics
…
Many MMDers enjoy“making pictures” with MikuMikuDance. Just open MMD, load
your models, your stage, your accessories … pose everything to look just the
way you want it … and “take the picture”.
MMD, under the FILE tab, has “Render to
Picture file(B)” … which lets you save the image you see as any of several
picture file formats. I like to capture my OWN images by using the Print-Screen
button on the upper-right of my computer’s keyboard. That puts the screen image
into the computer’s clipboard memory so that I can PASTE it into a window in my
Photoshop, GIMP or Paint program.
Music
Videosusing Downloadable Files …
See the LearnMMDtutorialMake a Music Video with MMD… to
see what’s involved in downloading the files you will need as you make an MMD
music video. Search YouTube for the title of the song that you want to do … and
include the word LINK in your search … like: "MMD Rather Be" link…
to find MMD videos that may include links to the various music and motion files
that you will need. You would download those files and put them together in MMD
to create your own version of that song’s MMD video! … You will need sets,
stages and accessories … and a bit of “know-how” as you put things together and
customize them to suit your needs. Learning the “know-how” is all part of the
fun! As you work on your animation, you will come across MANY exasperating
problems … just keep at it … stay with it … and you will get everything to
work!
Custom
3D animation from scratch …
What every MMDer is dreaming of
when they open MikuMikuDance for the first time!…
before they find out what they have gotten themselves into!
Creating 3D animations from scratchis a
complicated business … but I find it fun to learn. I have been running MMD for
over three years and I am still learning how to do it!
LearnMMD.com has a ton of tutorials (over
300) that explore many of the things you will want to know as you progress in
the art of 3D animation.
Most
important … Don’t give up!
Enjoy the process of learning
MikuMikuDance. So complicated, so many details … such satisfaction as you learn
something new about it.


 video editing… those finished MMD videos are each a masterpiece in mixing and editing layers of video and audio clips.
 Post-Production Editing adds the final “look” to your MMD video!