How do I make smooth motions in MikiMikuDance? How do I use the
interpolation curves to make better motions? What is the secret for getting
realistic model movement in MMD?
Let MikuMikuDance make smooth motions for you …
Easily
make smooth motions with MMD!
–
I often get comments asking…
“How
do I make smooth motions in my MMD animations?”
My answer is …
“Just
let MikuMikuDance do it for you!”
Of course …
There’s more TO it than that!
 By its very design, MikuMikuDance
creates smooth motions for you. You position a bone and Register it to mark the
start of a motion. You advance the frame counter to the next “hard point” of
your motion … you move the bone to the new position and you Register it.
MikuMikuDance creates the “in between” frames to animate the smooth motion as
the bone shifts from the first position to the next position.
By its very design, MikuMikuDance
creates smooth motions for you. You position a bone and Register it to mark the
start of a motion. You advance the frame counter to the next “hard point” of
your motion … you move the bone to the new position and you Register it.
MikuMikuDance creates the “in between” frames to animate the smooth motion as
the bone shifts from the first position to the next position.
Your job is to …
- Prepare for the motion
- Control the timing
- Set the interpolation curve if needed
– Prepare for the motion …
Say you are well into an animation, on
frame 75, and now you want to make Miku wink her right eye. There, on frame 75,
you slide the Wink slider to create the wink and you Register it.

When you push play to watch your
animation from the beginning, you notice that Miku’s right eye slowly closes,
right from the start, until, when it get’s to frame 75, her eye is shut.
That’s
hardly a “wink”!
Before you had set that motion, you
should have prepared for that new motion. In this case, you want to copy the
old Wink setting to the new location a frame-ahead of where you want the
new wink-motion to start.
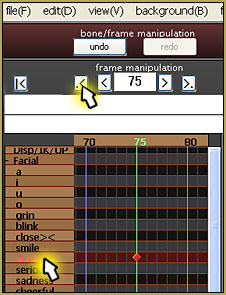
To find the previous setting of the
“Wink bone”, click +Facial to expand the Facial bone list and then, click to
highlight the bone Wink. Then click the “rewind” button to leap back to that
bone’s most recent registered position. Now, click that diamond to make it red
and Click COPY, beneath the bone menu list. This copies that diamond’s data.
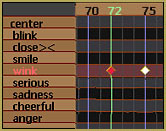
Now, return to frame 75 … back-up a frame to frame 74,
 and click PASTE … to put the old Wink
position data into frame 74.
and click PASTE … to put the old Wink
position data into frame 74.
Now when you click Play …
… the animation plays from frame Zero
to frame 75 … and nothing seems to happen until Miku’s eye “snaps shut” in
Frame 75, the last frame.
-Control the timing …
If you wanted Miku’s eye to suddenly
snap shut in frame 75, then you’re finished with that motion! … But suppose
you’d like a more realistic “wink”?
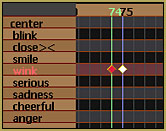
To
keep the “eye closed” position in frame 75, we will copy the frame-74 diamond,
delete that frame-74 diamond, back up a few frames and paste it into frame 72,
instead.
Now when you click Play …
… nothing seems to happen until the
end of the animation, when Miku closes her eye in a natural-looking motion. MMD
has created the “in-between” frames to create a smooth motion for you. So … now
Miku has one eye shut.
To complete the Wink, Copy the diamond
in frame 72 (the home position for this motion), and paste it into … what do
you think, how about frame 77? … wherever you’d like to paste it to complete
the motion. NOW when you click play, the eye quickly winks. Something about it
looks bad … it’s the Duration of the wink! That eye is
only closed for one frame! We need to
set things up to allow the eye to be closed for a more natural time … how about
3/4 of a second?
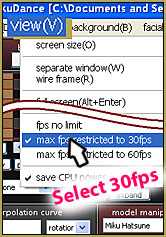
We want to set our animation speed to
30-Frames per second, the YouTube “normal”. Click the VIEW menu and select the
30fps setting at the bottom of that list of options.
Thirty
Frames per Second …
An MMD animation runs at
30-frames/second. We want our wink to last 3/4 of a second … 3/4 of thirty …
One-quarter of 30 equals 7 or 8 frames. I will set our wink to last for 21
frames (3×7).
Copy/Advance
the frame counter/Paste/Delete
The data in frames 75 and 77 need to
be copied and pasted so that the eye stays closed until … frame 96 (21 frames
of “wink eye closed”). Highlight the two diamonds (75 & 77) while holding
down the Shift key so that you can select them both. Click COPY. Advance the
frame counter to frame 96 and click PASTE. NOW we have go to back to frame 77 and
remove the diamond that makes Miku’s eye pop open … we want her eye to stay
closed for the


entire 3/4 of a second.
Now when you click Play …
… we have a nice wink motion.
To make that wink look more cute, you
will want to add some other head motions … and camerawork … (this gif
makes it look like someone yanks on her tie … but you get the idea!) … just
keep at it until you’ve got everything set just the way you want it!
-Set the Interpolation Curves …
The interpolation curves allow you to
set the dynamics of a particular motion … like “start slow and accelerate
through the motion” … like reaching back as you start to throw a ball; the hand
with the ball might start at the waist and make a sudden stop as it reaches the
end of the over-the-shoulder wind-up-for-the-pitch motion … and then accelerate
to high-speed as the arm swings forward to pitch that fastball! Without an
interpolation curve, the action would look like a robot motion.LearnMMD.com
has several great articles about using the interpolation curves … be
sure to read them … become a Motion-making master!